Showing posts with label DIY. Show all posts

Sunday, December 22, 2019

DIY Original Artwork Coffee Cups

This is an easy last minute gift idea featuring original art work.  A few weeks  ago I went to a Winterland / Holiday event for children and this was one of the arts and craft projects featured.  It was hands down the most popular craft table.  Kids from ages 1-2 years old and up to grammar school were decorating cups and having a blast.  Clearly the little ones, like my son and younger, needed some adult supervision and some help opening the markers, holding the cups, and reminding them not to draw on the table, floors, each other etc.  I'm not sure if he or I had more fun (I probably did), but this cup is my new, most favorite thing.
I proudly drink out of it all day at work because every time I see it, I smile.  And everyone who sees it thinks it is the most special gift... BECAUSE IT IS!  I have an original piece of art from my 2 year old that can be used daily and washed without fear of ruining his scribble artwork.  This is such a great alternative to picture cups and will also last for years to come.  Plus, it is a fun project to do with your kids and only takes a little more than 24 hours before it is cured and ready for use so it is a great last minute gift idea.  It is also a budget friendly gift.
Acrylic paint markers and cups can be purchased at your local arts and craft store (think Michaels, etc.).  I purchased all my supplies on Amazon.  For an even better deal look for coffee cups at your local dollar store.

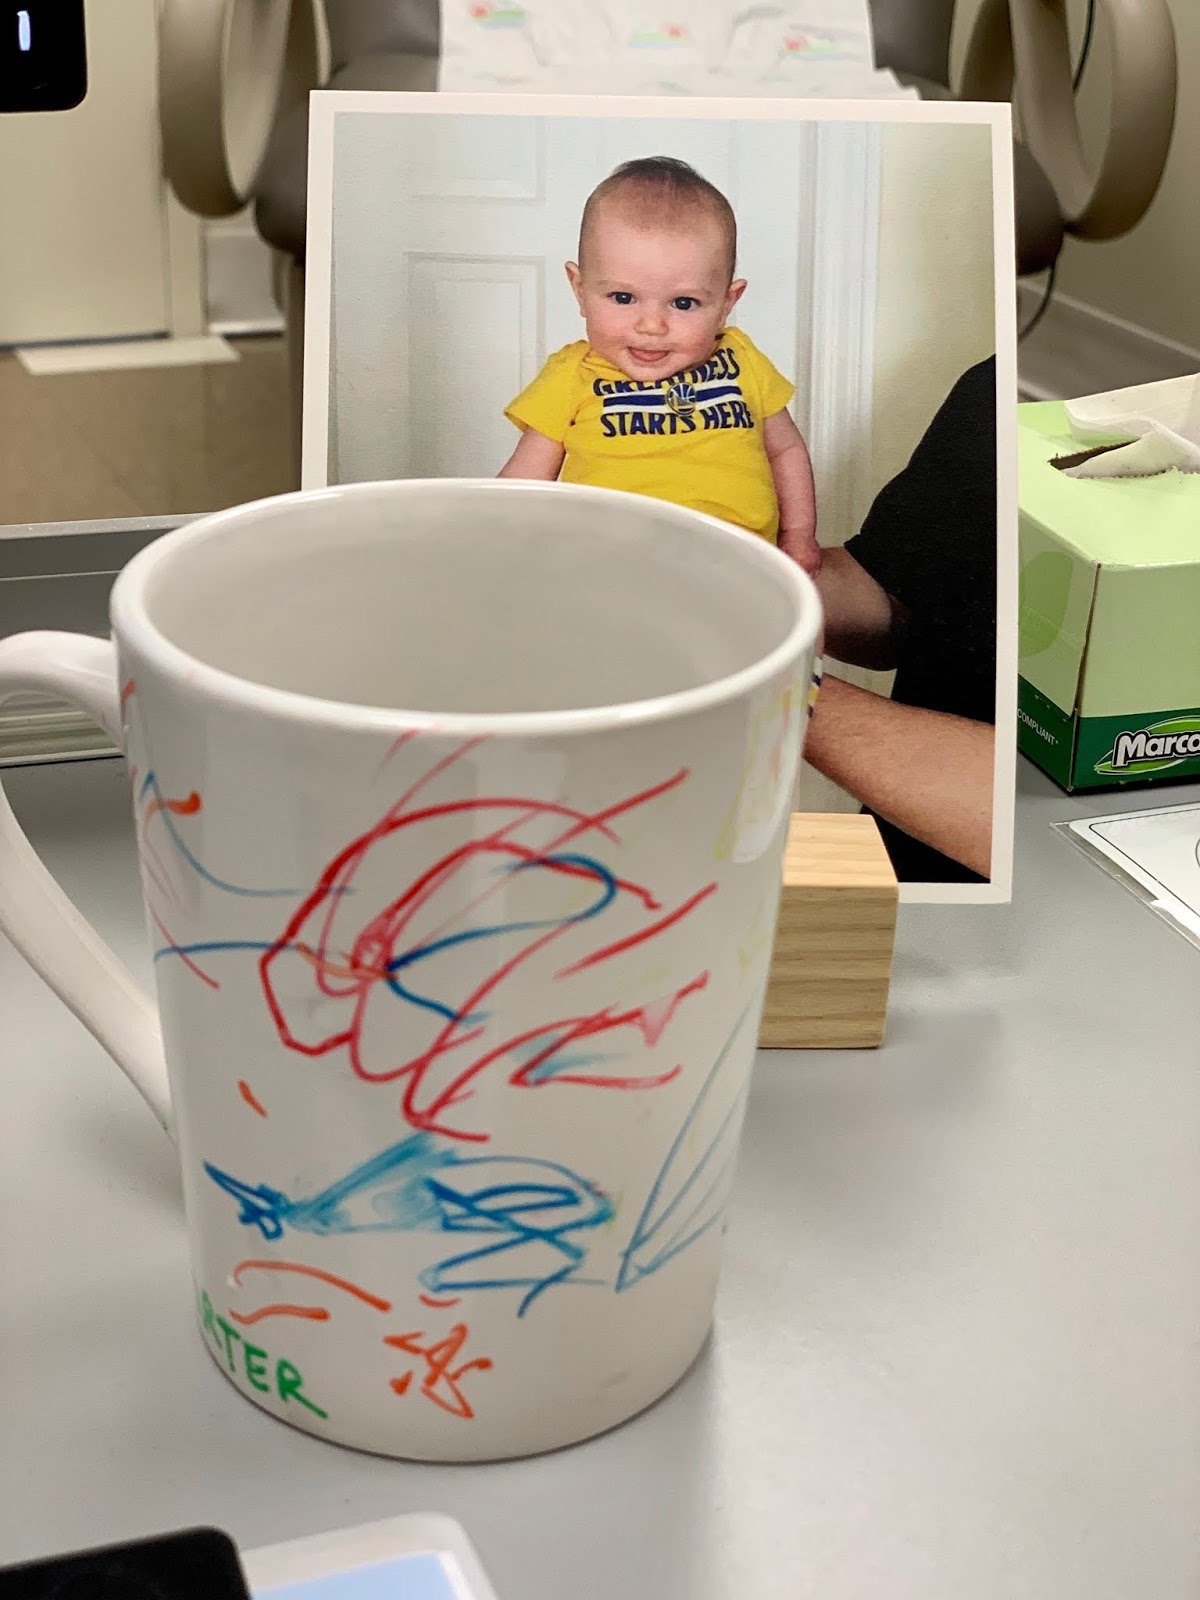
For this project you will need acrylic pens, ceramic coffee cups, and rubbing alcohol. And obvi some newspaper to cover your work space. I also recommend priming your markers so they are ready to use before sitting down to color, especially if you have a 2 year old like mine who is all about monkey see, monkey do. Once he saw me priming the markers he stopped wanting to color the cups and wanted to “boop” the table so we had to take a break and return to coloring the cups later.  And yes he still remembered and wanted to make one mark on the cup followed by a boop on the table, over and over...  While I chose coffee cups for this gift you can use any oven safe ceramic medium (plate, bowl, vase etc.). 
DIY Original Artwork Coffee Cups 

  • Acrylic paint pens / markers
  • Rubbing alcohol 
  • Ceramic mugs
  • Newspaper
Directions:
  1. Cover your workspace with newspaper
  2. Wipe cups with rubbing alcohol
  3. Prime markers so they are ready to draw with
  4. Once cups are dry let your child go crazy and color the cups to their liking.  (Why not color a cup with them?!)
  5. Let  cups sit undisturbed for 24 hours
  6. Bake for 40 minutes in a 300 degree oven or follow the directions recommended with the acrylic paint pen manufacture
  7. Let cool completely
Once cool wrap and gift or wash and use your original, one of a kind masterpiece.  

I also had fun making a cup and when my dad saw it he ranted and raved about it (he loves my original art) so I may consider giving him this cup I made.
Leave a comment with your finished project and Happy Holidays! 

Thursday, June 29, 2017

DIY Maternity Pants

I fit into my pre-pregnancy clothes during my first trimester.  Sure my pants got a little tight at the waist, but nothing that a hair elastic or Belly Band couldn't fix.  But then I hit 16 weeks and I had to find a solution.  Since I wasn't about to *gasp* buy maternity pants I decided to DIY some old work pants into maternity pants.  Because let's face it, I love a good DIY.


While I had the idea of maternity pants, I can't take any credit for this DIY (shout out to all you awesome DIYers).  There are tons of different maternity pant DIYs available on Pinterest.  I, however, liked the DIY instructions from What's Up Moms and the results were amazing!

While you can use a sewing machine I somehow managed to break mine so I was stuck doing this by hand.  It takes awhile, but I promise the end results are worth the effort, especially if you're like me and haven't gained any weight in your thighs (thank you sweet baby Jesus).  I find that most maternity pants I tried on fit in the waist, but were loose in the butt and thighs and no one wants to have people whisper behind their back that they have a grandma butt.  Then again...my mom, aka soon to be grandma, has an amazing derriere so maybe having a grandma butt isn't such a bag thing...

I've made a ton of DIY pants and shorts this pregnancy and made some modifications to What's Up Moms DIY.

Here are my directions for DIY Maternity Pants:
You will need:
A pair of pants (or shorts) that you don't mind repurposing
Needle and thread
Fabric scissors
Straight pins
4 inch elastic (I bought mine from Amazon)

Directions:
1. Cut out the front pockets.  Starting at the top of the waistband cut along the side seam making sure to remove the whole pocket.  Just be careful and don't cut a whole through the pants.  Repeat on the other side

2. Measure and cut the elastic 1.5x the length of the pocket you just cut making sure the elastic overlaps the seam


3. Line up the top of the elastic with the top of the jeans and pin in place.  Obviously repeat on other side.


4. Starting at the waistband sew the elastic in place along the seam.  Always make sure to start and finish your knots inside the pants.  I sewed the seam twice for extra reinforcement.  Repeat on other side

I matched the thread as best as I could to the color of the pants.  My sewing isn't the best (clearly), but in all honesty you can't see the new seam under shirts, especially long maternity shirts.

5. Trim the elastic on the inside.

6. Put on your DIY maternity pants and show off that adorable baby bump!

Thursday, August 11, 2016

Dishwasher Safe Glitter Dip


So there are two things that are true about me: I love shinny things and I love DIY projects.  Perhaps it's because I'm an only child and growing up I often had to entertain myself.  I've been glitter dipping things for awhile and I will say the more I do these projects the better they get.  I posted a YouTube video demonstrating how to glitter dip, but I've changed my technique and tools and am so happy with the results.  And now it is dishwasher safe!  

What you will need:

  • Item to glitter dip (mug, vase, bowl, etc.)
  • Rubbing alcohol
  • Cotton balls
  • Painters tape
  • Fine loose glitter (I love Martha Stewart's glitters)
  • Foam paint brush
  • Dishwasher safe Mod Podge
  • Newspaper
  • Patience!  


Directions:

  1. Apply newspaper for your work area.  
  2. Clean the item you are glitter dipping with rubbing alcohol.
  3. Apply painters tape above where you want your glitter to stop making sure to leave some room at the top of the item if it is a beverage container (I recommend at least an inch).  If you want your handle glitter dip also apply tape to the handle.
  4. Apply a thin layer of mod podge.
  5. Immediately cover with glitter.  Note: For the look I did I used different colors of glitter for an ombre effect.  I start from one side applying the lightest to darkest shades of glitter in thin sections.  Of course I pour the glitter over different pieces of newspaper so I can recycle the fall off.
  6. Let cup sit for at least 1 hour. 
  7. Apply another thin coat of mod podge.
  8. Cover with another layer of glitter as directed in step 5.  
  9. Let cup sit again for at least 1 hour.
  10. Apply one final thin coat of mod podge and let item set uninterrupted for 28 days.  (Yes I wrote 28!)
  11. Wash the item and enjoy

Sunday, December 20, 2015

Video Tutorial DIY Glitter Wine Glasses

Often I get intense desires to not do anything remotely important, but create things, often with glitter. These last few days have been no exception.

You ever have this intense desire to cover things in glitter?
Uh, me either.  Now I'm just lying.

DIY with glitter is super easy and there are a number of other tutorials on how to glitterize your favorite items.  I've been making glitter dipped items for over a year and I'm going to share the method that I find works the best after a lot of trial and error.  Your glasses will shine like diamonds in the sky and you won't get glitter all over you once the item is cured.  Plus these glasses make great Holiday gifts or gifts for your favorite girlfriends.

In this video I show you not only how to make a glitter dipped wine glass, but also how to cover up a logo (yes I go to a lot of wine festivals).  If you don't have any wine glasses to glitterize you can get them cheap at a dollar store.  My local dollar store has both traditional and stemless wine glasses for $1 a piece.

Tutorial DIY Glitter Wine Glasses
You will need:
- Wine glasses of your choosing 
- Painters tape
- Mod Podge or as I like to call it "Modge Podge" in glossy finish 
- Sponge brush or other small painting brush
- Fine glitter