Showing posts with label Chocolate. Show all posts

Friday, August 14, 2020

Dunkaroo Inspired Cookie Balls

Am I the only one with lots of nervous energy?  It's not anxiety, but more of need to do something mindless to zen me out.  Cooking is my therapy.  I guess baking and creating are too.  It is all related.  Cooking / baking is my time to be creative and focus my energy on creating something new while temporarily being able to put a pause button on life.  And then I have something, in this case beautiful and fun, to eat to comfort my feelings after I press the pause button back to play.  We are still in a global pandemic people!  It's stressful and I stress eat.

Dunkaroo Inspired Cookie Balls

Printable recipe

Yep, you read that right.  I was craving cake balls, but didn't have the energy to make cake.   I did, however, have a bag of Stauffer's Iced Animal Cookies that my husband bought for me at the start of the pandemic.  This giant size bag is under $3!  It's a steal.

For those who have never had these cookies, they are animal crackers with a light, sweet glaze.  Appropriately addicting for both children and adults alike.  As I sat in my kitchen eating these iced animal cookies dipped in rainbow chip frosting (hello DIY Dunakaroos) I decided to see if these two amazing ingredients could combine to create a perfect union.  FYI, they  do.

To make these cookie balls I crushed 2 cups worth of iced animal cookies in my Vitamix, but a food prossecor would work just fine as well.  You could also go old school and smash them in a zip lock bag with a meat pounder or wooden mallet, etc.  Get creative if you have to. 

Next I mixed the animal cookies with approximately 2/3 of a container of prepared rainbow chip frosting until combined.  The mixture will look like wet sand and hold its form.

I rolled the filling into equal balls, approximately 1.5 inch in diameter and then put then put them in the freezer for about 15 minutes to firm up. 

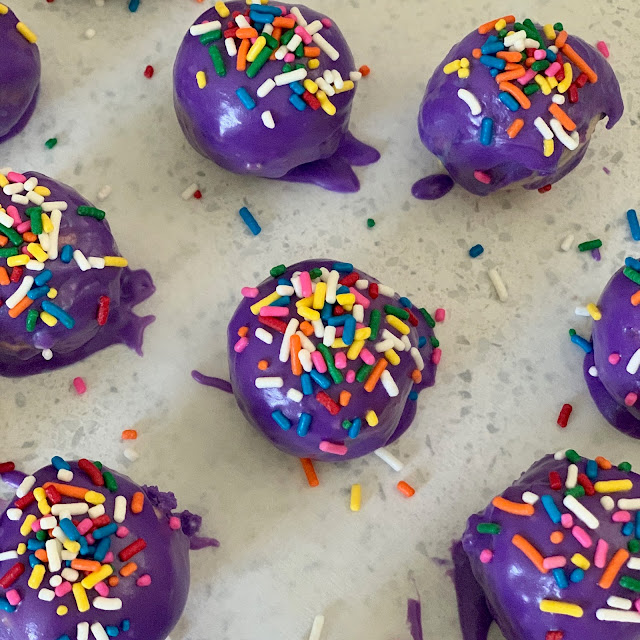
You could alternatively place the cookie balls in the fridge, but I find that they keep better form after a few minutes in the freezer when dipped in chocolate.  While the cookie balls are firming I melted 1 cup of white chocolate chips and mixed in a little food coloring for fun (my son wanted "PURRRPLE".  The glaze should be thin enough to easily coat the balls.  If the chocolate is too thick, and sometimes that happens if you melt it at too hot of a temperature, thin it  out with 1/2-1 tablespoon of milk or cream to achieve the right consistency.
I topped off each glazed cake ball with a generous pinch of colorful sprinkles and allowed to firm up on parchment paper.
So pretty!  And the taste reminds me of Dunkaroos, a childhood favorite treat.  They are sweet, slightly crunchy, and I bet you can't eat just one.

These can be made in one shot or assembled in stages.  You can always leave the formed cookie balls in the freezer until ready to glaze.  If you do this, allow the frozen cake balls to begin to thaw in the fridge a few hours before you glaze them.  Once glazed, store the cookie balls in an airtight container on the counter for a few days or in the fridge for a week.

Enjoy!

Dunkaroo Inspired Cookie Balls

Printable recipe

Ingredients:

  • 2 cups iced animal crackers, crushed

  • 1 container rainbow chip frosting

  • 1 cup white chocolate chips or melting chocolate

  • Any color food coloring

  • Milk as needed

  • Sprinkles of your choosing

Directions:

  1. Combine crushed animal crackers with 2/3 container of icing to form dough.  The dough should feel like wet  sand and hold its form

  2. Role cookie mixture into equal balls, aroximately 1.5 inches in diameter.  Set on freezer safe baking sheet and allow to set for 15 minutes

  3. Meanwhile melt 1 cup chocolate and add in a few drops of your favorite color of food coloring. Add milk if needed to thin out glaze

  4. Dip each ball in melted chocolate. Top with sprinkles, and allow to sit on parchment paper until chocolate sets

Wednesday, July 3, 2019

Chocolate Covered Coco-Nut Stuffed Dates


I keep saying I’m going to blog more, but life...  Speaking of life, these last two weeks with my new son, Luke, have been amazing and so much easier than with Carter.  But Luke already has a very different temperament than Carter, who had bothersome reflux and colic from earlier on.  Also this isn’t my first rodeo.  Anything is easier when you know what to expect. Like lack of sleep, breast engorgement, nursing every one to three hours with cluster feeding, changing 13-15 diapers a day… But it is all worth it! 


To get this little one into the world I casually tried a few wives tales to help make my cervix favorable.  Like eating date after date after date.  Did it work?  No idea.  But in full disclosure I couldn’t eat dates every day, let alone 6 dates a day, which is the recommendation for softening the cervix.  It’s not that I don’t like dates, I love them, but they are crazy calorie dense and I tried to save my calories for my nightly slice of carrot cake.  Don’t you judge me!  The pregnancy cravings are real.  And flash forward to two weeks postpartum and I’m still craving sweets, specifically those that are both salty and sweet like these stuffed dates.  But it’s all good since breastfeeding burns tons of calories... right?  Treat. Yo. Self.  I always do.  So why don't you take a page from my book and treat yo self to these delicious chocolate covered coconut and nut stuffed dates.

Chocolate Covered Coco-Nut Stuffed Dates


Ingredients:
  • 8 Medjool dates*
  • 1/4 cup chopped nuts (I used a mix of 1/8 cup walnuts and 1/8 cup pecans)
  • 1 tablespoon honey
  • 1 tablespoon unsweetened flake coconut
  • 1/4 teaspoon salt
  • 50 grams semi sweet chocolate chips or melting chocolate
  • 1 teaspoon coconut oil
  • Optional: hemp seeds
Directions:
1. Remove pit by slicing the dates lengthwise with a sharp knife to expose pit.  Remove pits and discard.  Set pitted dates aside until step 3


2. In a small bowl combine nuts, honey, coconut, and salt


3. Stuff each date with the nut mixture ensuring to pack the nut mixture into the dates 


4. Pinch the cut edges of the date closed over the nut mixture


5. Place dates on parchment lined baking sheet and place in freezer while preparing the chocolate dipping sauce

6. Melt chocolate for dipping.  I use a double boiler method by bringing 1 inch of water in a small sauce pan to a boil. As water boils add chocolate and oil to a small glass bowl. Once boiling, place glass bowl over sauce pan (the glass bowl should sit above the boiling water, but not touch it)


8. Stir chocolate and oil frequently until melted and incorporated.  Remove melted chocolate from heat and immediately go to step 9


9. Remove dates from freezer and dip stuffed dates halfway into chocolate.  Place dates back on parchment lined baking sheet to harden


Optional: You can stop at step 9 before placing dipped dates in fridge to harden or you can add a few sprinkles of hemp seeds while chocolate is still warm for added crunch and contrast of color (aesthetics people)


10. Place finished dates in fridge until chocolate sets, approximately 10 minutes.  Leave in fridge until ready to serve


And enjoy!  Preferably with a glass of something bubbly and fabulous.  


I dare you to try to eat just one.

* This recipe is best with fresh dates, however, if your dates are starting to dry out you can add life to them again by soaking them in hot water for a minute.  Dry dates thoroughly before stuffing.  

Saturday, February 16, 2019

Peanut Butter Filled Chocolate Snickerdoodle Cookies

During my last pregnancy my high risk doctor friend (ya, I know people) told me I needed to eat peanut butter to help reduce the chances of my son having a peanut allergy.  This conversation occurred somewhere in my third trimester.  Up until that point I rarely, if at all, ate any peanut products.  I wouldn't say I had an aversion, but I most definitely didn't crave peanuts or peanut butter.  Lucky for me, or perhaps lucky for Carter, my son doesn't have a peanut allergy.  But of course he hates peanut butter, both texture and taste.  He did, however, smile through half of a cookie before signing to me that he was "all done."

This time around I have been making an effort to consume peanut products to help reduce baby Della Favorite #2's chance of having a peanut allergy.  These cookies are delicious and satisfying, without being overly sweet.  They are also light on the sugar, especially if you use a sugar substitute, and who doesn't like a surprise filling?  Am I right?
You know I am.  If you love peanut butter and chocolate then this recipe is for you.

Some notes before we begin.  For a lower sugar option use Swerve or another sugar substitute, but these are light on the sugar even if you use the real thing.  You can substitute peanut butter for the nut butter of your choosing.  Also feel free to freeze the peanut butter filling for longer than 20 minutes, but I would not freeze them any less since they quickly soften with handling.  I ended up freezing my filling for about an hour as I got interrupted by a screaming toddler in the middle of my cookie making.  They still came out marvelous!
 
Peanut Butter Filled Chocolate Snickerdoodle Cookies
Makes 10 cookies
Ingredients:
   Peanut Butter Filling: 
  • 6 tablespoons natural peanut butter, room temperature
  • 2 tablespoons powdered sugar
   Chocolate Cookie Dough:
  • 4 tablespoons butter, softened
  • 2 tablespoons granulated sugar, divided
  • 2 tablespoons light brown sugar
  • 2 tablespoons peanut butter
  • 1 large egg
  • 1/2 teaspoon vanilla extract
  • 2 tablespoons unsweetened cocoa powder
  • 2/3 cup all purpose flour
  • 1/4 teaspoon baking soda
  • 1/4 teaspoon baking powder
  • 1/4 teaspoon of salt
   Cinnamon Sugar Mix:
  • 1 tablespoon granulated sugar
  • 1 teaspoon ground cinnamon
Directions:
1. Line baking sheet with parchment paper
2. In medium bowl combine 6 tablespoons peanut butter and powdered sugar until fully combined
3. Divide peanut butter mixture into 10 mounds on parchment lined baking sheet.  Freeze peanut butter filling for 20 minutes until hardened
4. Preheat oven to 350 degrees
5.  In a medium bowl combine cocoa powder, flour, baking soda, baking powder, and salt.  Set aside for step 8
6. In large bowl combine butter,  sugars, and remaining 2 tablespoons of peanut butter.  Then add in egg and vanilla and mix until fully incorporated
7. Add the dry ingredients to wet ingredient and mix until fully combined to make chocolate cookie dough
 8.  Separate chocolate cookie dough into 10 balls
9. Remove peanut butter from freezer and immediately start step 10
10. Flatten chocolate cookie dough into a thin disk and add 1 piece of peanut butter filling to the center of the disk

11. Roll chocolate cookie dough around peanut butter into a ball so you can't see the peanut butter filling. Continue with remaining chocolate cookie dough and peanut butter filling until you have 10 balls filled with the peanut butter mixture
12. Combine 1 tablespoon sugar and 1 teaspoon cinnamon in small bowl. Roll cookie balls into cinnamon sugar mix and place on parchment lined baking sheet
13. Flatten balls until about 1/4 inch thick with hands or fork.  I like to make a lattice pattern


16. Bake at preheated oven for 9 minutes until set and then transfer to cooling rack


While you can eat these at room temperature they are so much better when warmed.  I recommend allowing the cookies to cool for at least 10 minutes before serving with a nice glass of milk.

Sunday, April 24, 2016

Oatmeal Raisin Candy Pizza

Well a few days went by and I didn't post my candy pizza recipe, but I am here, I have a few minutes, and we're doing it.  Better late than never right?  I've been making candy pizzas since I was a little girl.  I would bring these to soccer games and parties and they would be devoured in minutes.  Even at a young age there was something about seeing other people enjoying my food that made me feel happy.  

I created this candy pizza recipe after staring at a surplus of oatmeal that neither my husband or I wanted to eat.
My husband likes his oatmeal sweet and apparently Trader Joe's Oatmeal Complete is not sweet enough.  Honestly, I never tried this because I try and stay away from foods with added sugars as they make my sugar cravings more intense.

I had a trusty pizza pan that I had used and abused for years, but sadly it had to go to retirement.  I ordered the above pizza pan on Amazon, not realizing that it was a 10 inch pan.  This ended up being a perfect size pan for a small group (I made this for a party of 10 and everyone got a large slice).  You can make this for a larger party with a standard sized pizza pan just make sure to double the recipe.  I normally make chocolate chip cookie as the base, but any cookie (sugar, peanut butter, snickerdoodle) can be substituted.  Feel free to use your imagination!  

OATMEAL RAISIN CANDY PIZZA
Ingredients
1/2 cup of flour
3/4 cup of instant flavored oatmeal (I used 2 packets of Trader Joe's Complete Brown Sugar and Maple Oatmeal)
1/2 tsp baking powder
1/2 stick butter, softened 
1/2 cup brown sugar
1/2 beaten egg
Pinch of salt
1/2 tsp vanilla extract
1/2 tsp ground cinnamon
1/4 cup raisins
1.5 ounces semi sweet chocolate (chocolate chips or chopped chocolate chunks)
Peanut butter
Toppings of choice (candy, shredded coconut, powder sugar, sprinkles)

Directions
1. Preheat oven to 350 degrees
2. Line a 10 inch pizza pan with parchment paper
3. In a small bowl mix flour, oatmeal, and baking powder.  Reserve for later
4. Beat butter and brown sugar in a large bowl
5. Add egg, salt, vanilla, and cinnamon.  Mix until incorporated
6. Mix in the oatmeal dry mix and raisins   
7. Place all the cookie dough on a parchment paper lined pizza pan  
8.  Flatten dough evenly over the pan in the shape of a pizza
9.  Bake cookie for 15 mins or until cookie dough is cooked through
10.  While the cookie is cooking chop the candy into small pieces.  Reserve for later after we spread the cookie pizza
11.  Once the cookie is done cooking immediately top it with chocolate chips and peanut butter so it can soften and spread easily.  (I use about 2-4 tablespoons peanut butter, but I don't normally measure this.) As the peanut butter and chocolate begin to soften spread the mixture evenly over the cookie leaving the "crust" as if you were spreading sauce on pizza dough
12.  Immediately top with the toppings of your choice.  As everything cools it will stick together