Showing posts with label Recipes. Show all posts

Sunday, May 3, 2020

Lemon Ricotta and Butternut Squash Crostini

Fun fact: I don't like the smell of raw butternut squash.  Ripe or not, when I smell raw butternut squash I notice a sour aroma.  But don't fear, the sour smells resolves with cooking. And the taste, oh the taste, when seasoned and sweetened, is warm and comforting.  One of my favoritebutternut squash dishes is the Autumn Squash Soup from Panera Bread.  I have yet to find or make a recipe that compares to Panera Bread's soup so I leave this soup to the Panera professionals.  If you have a great copycat recipe please send it my way.

Fun fact 2: My husband doesn't like butternut squash, but, and this is a big but (and I cannot lie), he loves this appetizer.


He specifically asked me to make it for our Quarantine Easter.  But a global f@cking pandemic prevented us from making this appetizer.  Our family is taking this physical distancing thing seriously.  I've only physically gone into a grocery store once since March 16 and that was because tons of items on my grocery pickup were unavailable, including butternut squash, lemon, and sage, and I wanted to see if the items were really "unavailable" or if the shoppers were just too overwhelmed / lazy / burnout / all of the above(?).  The short version of that story is many items I wanted were available when I went in to the store, but the items I needed to complete this dish were not.  So fast forward to last week when I was finally able to get my hands on lemon, sage, and a beautiful seeded baguette from my local health food store and we were in business.


I first had a variation of this appetizer served at a holiday hosted by my husband's aunt, a phenomenal cook.  We haven't shared Easter or Thanksgiving with that part of his family in a few years now, but this appetizer is still one of my absolute favorites (and clearly my husband's as well).  It is sweet and savory and when assembled is a gorgeous few bites of food.


It is also a great dish to let guests DIY.

Another reason I love this appetizer is the ricotta, butternut squash, and sage may be cooked the day before.  Just make sure you let the elements come to room temperature before serving.


Lemon Ricotta and Butternut Squash Crostini 

Printable Recipe

Ingredients:

  • 20 ounces of butternut squash, peeled, seeded, roughly chopped
  • 2 tablespoons extra virgin olive oil (EVOO), divided
  • 1 tablespoon brown sugar
  • 1/4 teaspoon nutmeg
  • 1 tablespoon butter
  • 1 sourdough baguette, sliced 3/4 inch thick
  • 3/4 cup ricotta cheese
  • Zest of one lemon
  • Salt and pepper to taste
Directions:
  1. Preheat oven to 425 degrees.  Toss butternut squash with 2 tablespoons EVOO, brown sugar, nutmeg, 1/2 teaspoon salt and 1/4 teaspoon pepper and transfer to parchment paper lined baking sheet.  Roast squash until soft, approximately 30 minutes, tossing butternut squash halfway through.  Once roasted, set squash aside *(see notes below).
  2. Meanwhile combine ricotta and lemon zest in small dish.  Add salt and pepper to taste.  Set aside.
  3. Heat butter in a medium skillet over medium-high heat. Once butter is melted add sage and cook until sage turns dark green and edges start to curl, approximately 2 minutes.  Transfer sage to plate lined with paper towels to absorb excess oil.  Reserve butter in skillet for next step.
  4. Once butternut squash has roasted, reduce heat to 350 degrees **.  Dip one side of bread in sage butter.  Transfer bread to baking sheet butter side up.  Toast bread until browned, approximately 10 mins.
  5. Layer toasted baguettes with lemon ricotta, butternut squash, and a piece of sage.  

      Or transfer the elements to pretty dishes and let your guests get their DIY on.


Notes:

* Taste before serving and season with additional salt and pepper to taste if needed.  I tend to like things salty, my husband not so much, so I tend to be conservative with the salt (IMHO).
** If you are bougie and have two ovens, use your second oven to toast buttered bread slices while the squash finishes roasting. 

Wednesday, October 9, 2019

Pork Chops with Apples and Herb Mustard Gravy


Creative recipe name right?  What I wanted to call this recipe was BIG ASS Pork Chops with apples, but what if kids are reading this?  And by kids I mean Master Chef Junior wannabes.  And side note, if you are reading this, and ARE a Master Chef Junior wannabe or former contestant, I am so flattered!

It's apple picking season here in New Jersey.   I look forward to our yearly excursion to pick apples and then reward ourselves with warm apple cider donuts and apple cider.   After all, you do get a ton of steps walking the orchards looking for the apples that make the cut to bring back home.


If you are wondering what happens to the apples that don't make the cut they get thrown.  Carter clearly has a pitching arm.  And apple picking is even more fun now that I have a toddler who loves all things apple picking too.  


Every day Carter used to ask for a "nana" aka banana, but since apple picking this past weekend he wants an apple in the morning and an apple in the evening.  


Considering we bought a gagillion (I'm making gagillion a thing) apples, I oblige his requests.  Plus a little natural fiber can't hurt...  While I love apples too, especially with yogurt dip or cashew butter, I often need a break from eating them in their raw state.  And apples and pork are a tried and true fantastic pair.


Anyone who knows me knows I love pork and sweet and savory combinations are my jam.  My Pork Chops with Apples and Herb Mustard Gravy is both sweet and savory.  This recipe uses apples and apple cider, not apple cider vinegar.  When I hear "apple cider" I automatically think of vinegar so it's important we clarify that now since the two, while fabulous, are not the same.  However, I love apple cider vinegar, and have made this recipe sans apple cider with ingredients most people keep in their cupboard pantry (us small house folk don't have pantries).  If  you don't have apple cider, an alternate sauce base is 2 ounces apple cider vinegar, 2 ounces chicken stock, and 2 teaspoons honey combined.  Feel free to use smaller pork chops and or boneless, but adjust the cooking time accordingly.  While restaurants may tell you that the chef recommends a medium rare pork, I do not like, nor recommend eating pork raw.  Neither does the USDA who make the following recommendation when cooking pork:
Cook all raw pork steaks, chops, and roasts to a minimum internal temperature of 145 °F as measured with a food thermometer before removing meat from the heat source. For safety and quality, allow meat to rest for at least three minutes before carving or consuming. For reasons of personal preference, consumers may choose to cook meat to higher temperatures.  (Link to full article here)
Now on to the recipe.  If you try it, let me know how you like it and leave me some love in the comments below.

Pork Chops with Apples and Herb Mustard Gravy

Printable Recipe


Ingredients:
  • 2 bone in pork chops, 1.5-2 inches thick (the thicker the better... am I  right?  You know I am)
  • 2 apples, cored and thinly sliced
  • 2 tablespoons butter, divided
  • 8 tablespoons apple cider, divided
  • 1 tablespoon Dijon mustard
  • 1 teaspoon chopped fresh herbs (I like rosemary and thyme)
  • 1/4 teaspoon Wondra flour
  • Salt and pepper to taste
Directions:
  1. Preheat  oven to 400 degrees
  2. Season pork chops on both sides with salt and pepper
  3. Melt 1 tablespoon butter in oven safe pan over medium-high heat.  Cook pork chops for 5 minutes per side or until browned
  4. Once pork chops are browned on both sides add 6 tablespoons of apple cider to pan and immediately place in the oven to finish baking for 10-15 minutes or until pork reaches an internal temperature of 145-160 degrees
  5. While pork is baking, melt remaining 1 tablespoon of butter in a sauté pan over medium high heat.  Add apples and remaining 2 tablespoons of apple cider and cook moving apples  around in pan for 5-10 minutes until apples are browned and beginning to soften.  Once cooked, remove from heat, and season with salt and pepper to taste
  6. Once pork is cooked remove from pan and allow to rest for 3 minutes
  7. While pork rests whisk in mustard and herbs into pork pan drippings until combined.  Whisk in Wondra flour for one minute to thicken sauce
  8. Serve pork chops over sautéed apples.  Top with pan dripping gravy
I recommend serving the pork chops with sheet pan roasted potatoes and asparagus (recipe to follow so stay tuned).  In the meantime check out my other potato and asparagus recipes:

Roasted Asparagus
Crispy Parmesan Roasted Potatoes

For those of you who didn't notice I will now be providing links to printable versions of my recipes.  Ideally I will  update all my recipes with printable links in the future, but cut a girl some slack while I enjoy the end of my maternity leave with Luke.

    Friday, July 26, 2019

    Coconut Cashew Protein Balls Recipe

    I love LARABAR Original Fruit & Nut Bars. What's not to love about dates, nuts, and spices?  These bars are rich and decadent with good for you ingredients.  I often reach for a LARABAR when I'm craving something sweet and trying to be good.  Emphasis on trying.  Even though LARABARs are often sold among protein bars I would argue they are not a protein bar considering they average 3-5 grams of protein per bar.  However, what they lack in protein they more than make up for in flavor and texture.  LARABARs are soft and moist and not the protein bar bricks I grew up with that my mom used to share with our family dog during long runs.  Totally not making that up.  My former dog loved peanut butter flavored PowerBars.  She also loved GU gel, which at the time was the only soft protein product around.  Who else remembers the weird goodness that was GU?

    I've been experimenting with recipes in search of making my own protein treat that's not a dry brick.  After a few failures (I gave up on protein cookies) I believe I finally achieved what I set out to do with this recipe.  These protein balls are soft and moist (I have to stop saying "moist") and don't have that artificial protein taste found in so many commercial protein goods.  I would describe them as LARABAR Cashew Cookie meets Trader Joe's Coconut Cashews.  And if you have tried either, they are both equally awesome.

    You can still make these protein balls even if you don't have coconut flavored protein powder lying around.  Vanilla would be a substitute with a similar taste.   I'm sure chocolate would also be good, however, I'm more of a vanilla gal.  Actually I'm more sprinkles, but I've completely lost track of the direction of this post.  Just remember the flavor profile will be different if you use a different protein powder or nut butter flavor.  If you do go rouge, and we all know I'm a fan of going rouge, let me know how your protein balls turned out in the comments below.

    Coconut Cashew Protein Balls 


    Ingredients:
    1/2 cup uncooked oatmeal
    1 scoop coconut flavored whey protein powder, approximately 1/4 cup (I like and use ISOPURE Low Carb Protein Powder in Toasted Coconut)
    3 tablespoons hemp seeds
    1/2 cup unsweetened coconut flakes
    4 tablespoons cashew butter
    1 tablespoon agave nectar*
    2-3 tablespoons water
    Optional: extra coconut flakes to roll balls in

    Directions:
    1.  Put all ingredients except optional coconut flakes into food processor.  Pulse until ingredients are incorporated and dough is soft.  If dough is dry and crumbly add one tablespoon of water at a time until desired consistency is achieved
    2. Roll dough into 1 inch sized balls
    3. Optional: roll formed balls in extra coconut flakes

    Enjoy immediately or bring these protein balls with you for an on the go delicious, protein-packed treat.

    * For a sweeter protein ball use 2 tablespoons agave and 2 tablespoons water in above recipe

    Saturday, July 20, 2019

    Super Easy Tie Dye Sugar Cookies Recipe


    It's a billion degrees up in here.   It is so hot here in New Jersey that we have a heat advisory, which means stay inside.  Keeping a super active almost 23 month old entertained all day is a challenge (this is why we have the wonderful thing that is daycare).  Normally we spend lots of time outside so Carter can run, run, have a snack, drink water, and run some more.  But keeping him entertained all day inside while breastfeeding his month old brother seems nearly impossible.  This is where projects come in.

    Carter loves projects where he can help.  Seriously my son is the best little helper.  He loves to "help" sweep the floor, wash dishes, and load and empty the dishwasher, all with supervision.  He is also starting to get into cooking and baking, although his attention span is limited if a recipe requires too many steps.  That's why this recipe is perfect.  While you could make your own sugar cookies, I use premade dough, which I cook and cool before it is time to glaze.  I love the kid, but he doesn't need to learn how the oven works yet.  These cookies need to set so I highly recommend making them before nap time so they are ready to enjoy once your little one wakes up.  And lastly, make sure you have some wet paper towels on hand to clean those little fingers, because if your child is like mine, then half the fun is getting the glaze all over your hands.  I get it.  Glaze feels like slime and slime is life.  Just don't be like me and lick the glaze off your fingers in front of your mini me because monkey see, monkey do and Carter is at the age that if he sees you do something once he will do it again and again.  You have been warned.

    Super Easy Tie Dye Sugar Cookies Recipe


    Ingredients:

    • 16 ounce sugar cookie dough
    • 1/2 cup powdered sugar
    • 1 teaspoon light corn syrup
    • 1 tablespoon water
    • Food coloring
    Tools:
    Toothpick

    Directions:
    1.  Bake sugar cookies according to package directions.  Allow to completely cool before making glaze
    2.  Make glaze by combining powdered sugar, corn syrup, and water in a shallow dish.  Mix until glaze is smooth and thin, but not runny.  If needed add water 1 teaspoon at a time to reach desired consistency


    3. Add drops of food coloring of different colors into glaze


    4. Drag a toothpick through food coloring in various directions to get a marbled look


    5. Dip tops of cookies into glaze and place back on cooking sheet and or wire rack to set, approximately 1 hour


    6. Enjoy with a nice cold glass of milk


    As always mom tested, Carter approved!


    Wednesday, July 3, 2019

    Chocolate Covered Coco-Nut Stuffed Dates


    I keep saying I’m going to blog more, but life...  Speaking of life, these last two weeks with my new son, Luke, have been amazing and so much easier than with Carter.  But Luke already has a very different temperament than Carter, who had bothersome reflux and colic from earlier on.  Also this isn’t my first rodeo.  Anything is easier when you know what to expect. Like lack of sleep, breast engorgement, nursing every one to three hours with cluster feeding, changing 13-15 diapers a day… But it is all worth it! 


    To get this little one into the world I casually tried a few wives tales to help make my cervix favorable.  Like eating date after date after date.  Did it work?  No idea.  But in full disclosure I couldn’t eat dates every day, let alone 6 dates a day, which is the recommendation for softening the cervix.  It’s not that I don’t like dates, I love them, but they are crazy calorie dense and I tried to save my calories for my nightly slice of carrot cake.  Don’t you judge me!  The pregnancy cravings are real.  And flash forward to two weeks postpartum and I’m still craving sweets, specifically those that are both salty and sweet like these stuffed dates.  But it’s all good since breastfeeding burns tons of calories... right?  Treat. Yo. Self.  I always do.  So why don't you take a page from my book and treat yo self to these delicious chocolate covered coconut and nut stuffed dates.

    Chocolate Covered Coco-Nut Stuffed Dates


    Ingredients:
    • 8 Medjool dates*
    • 1/4 cup chopped nuts (I used a mix of 1/8 cup walnuts and 1/8 cup pecans)
    • 1 tablespoon honey
    • 1 tablespoon unsweetened flake coconut
    • 1/4 teaspoon salt
    • 50 grams semi sweet chocolate chips or melting chocolate
    • 1 teaspoon coconut oil
    • Optional: hemp seeds
    Directions:
    1. Remove pit by slicing the dates lengthwise with a sharp knife to expose pit.  Remove pits and discard.  Set pitted dates aside until step 3


    2. In a small bowl combine nuts, honey, coconut, and salt


    3. Stuff each date with the nut mixture ensuring to pack the nut mixture into the dates 


    4. Pinch the cut edges of the date closed over the nut mixture


    5. Place dates on parchment lined baking sheet and place in freezer while preparing the chocolate dipping sauce

    6. Melt chocolate for dipping.  I use a double boiler method by bringing 1 inch of water in a small sauce pan to a boil. As water boils add chocolate and oil to a small glass bowl. Once boiling, place glass bowl over sauce pan (the glass bowl should sit above the boiling water, but not touch it)


    8. Stir chocolate and oil frequently until melted and incorporated.  Remove melted chocolate from heat and immediately go to step 9


    9. Remove dates from freezer and dip stuffed dates halfway into chocolate.  Place dates back on parchment lined baking sheet to harden


    Optional: You can stop at step 9 before placing dipped dates in fridge to harden or you can add a few sprinkles of hemp seeds while chocolate is still warm for added crunch and contrast of color (aesthetics people)


    10. Place finished dates in fridge until chocolate sets, approximately 10 minutes.  Leave in fridge until ready to serve


    And enjoy!  Preferably with a glass of something bubbly and fabulous.  


    I dare you to try to eat just one.

    * This recipe is best with fresh dates, however, if your dates are starting to dry out you can add life to them again by soaking them in hot water for a minute.  Dry dates thoroughly before stuffing.  

    Saturday, February 16, 2019

    Peanut Butter Filled Chocolate Snickerdoodle Cookies

    During my last pregnancy my high risk doctor friend (ya, I know people) told me I needed to eat peanut butter to help reduce the chances of my son having a peanut allergy.  This conversation occurred somewhere in my third trimester.  Up until that point I rarely, if at all, ate any peanut products.  I wouldn't say I had an aversion, but I most definitely didn't crave peanuts or peanut butter.  Lucky for me, or perhaps lucky for Carter, my son doesn't have a peanut allergy.  But of course he hates peanut butter, both texture and taste.  He did, however, smile through half of a cookie before signing to me that he was "all done."

    This time around I have been making an effort to consume peanut products to help reduce baby Della Favorite #2's chance of having a peanut allergy.  These cookies are delicious and satisfying, without being overly sweet.  They are also light on the sugar, especially if you use a sugar substitute, and who doesn't like a surprise filling?  Am I right?
    You know I am.  If you love peanut butter and chocolate then this recipe is for you.

    Some notes before we begin.  For a lower sugar option use Swerve or another sugar substitute, but these are light on the sugar even if you use the real thing.  You can substitute peanut butter for the nut butter of your choosing.  Also feel free to freeze the peanut butter filling for longer than 20 minutes, but I would not freeze them any less since they quickly soften with handling.  I ended up freezing my filling for about an hour as I got interrupted by a screaming toddler in the middle of my cookie making.  They still came out marvelous!
     
    Peanut Butter Filled Chocolate Snickerdoodle Cookies
    Makes 10 cookies
    Ingredients:
       Peanut Butter Filling: 
    • 6 tablespoons natural peanut butter, room temperature
    • 2 tablespoons powdered sugar
       Chocolate Cookie Dough:
    • 4 tablespoons butter, softened
    • 2 tablespoons granulated sugar, divided
    • 2 tablespoons light brown sugar
    • 2 tablespoons peanut butter
    • 1 large egg
    • 1/2 teaspoon vanilla extract
    • 2 tablespoons unsweetened cocoa powder
    • 2/3 cup all purpose flour
    • 1/4 teaspoon baking soda
    • 1/4 teaspoon baking powder
    • 1/4 teaspoon of salt
       Cinnamon Sugar Mix:
    • 1 tablespoon granulated sugar
    • 1 teaspoon ground cinnamon
    Directions:
    1. Line baking sheet with parchment paper
    2. In medium bowl combine 6 tablespoons peanut butter and powdered sugar until fully combined
    3. Divide peanut butter mixture into 10 mounds on parchment lined baking sheet.  Freeze peanut butter filling for 20 minutes until hardened
    4. Preheat oven to 350 degrees
    5.  In a medium bowl combine cocoa powder, flour, baking soda, baking powder, and salt.  Set aside for step 8
    6. In large bowl combine butter,  sugars, and remaining 2 tablespoons of peanut butter.  Then add in egg and vanilla and mix until fully incorporated
    7. Add the dry ingredients to wet ingredient and mix until fully combined to make chocolate cookie dough
     8.  Separate chocolate cookie dough into 10 balls
    9. Remove peanut butter from freezer and immediately start step 10
    10. Flatten chocolate cookie dough into a thin disk and add 1 piece of peanut butter filling to the center of the disk

    11. Roll chocolate cookie dough around peanut butter into a ball so you can't see the peanut butter filling. Continue with remaining chocolate cookie dough and peanut butter filling until you have 10 balls filled with the peanut butter mixture
    12. Combine 1 tablespoon sugar and 1 teaspoon cinnamon in small bowl. Roll cookie balls into cinnamon sugar mix and place on parchment lined baking sheet
    13. Flatten balls until about 1/4 inch thick with hands or fork.  I like to make a lattice pattern


    16. Bake at preheated oven for 9 minutes until set and then transfer to cooling rack


    While you can eat these at room temperature they are so much better when warmed.  I recommend allowing the cookies to cool for at least 10 minutes before serving with a nice glass of milk.

    Sunday, February 10, 2019

    Italian Sausage, Pepper, Green Onion and Cheddar Quiche

    Quiche is one of my favorite entrees.  It is a people pleaser regardless if you have it in the AM, brunch, or PM.  In my opinion, quiche is a great dinner staple, and I personally love breakfast for dinner.  If you use a premade pie crust, the only "hard" part about quiche is waiting for it to cook.
    Kid tested, mother approved
    Quick and easy meals that I can make after I put my son to bed are also a must.  And what is quicker than letting your entree come to room temperature or heating it in the oven for a few minutes until warm while you whip up a delicious side salad?  Exactly... Quiche is a great busy week night meal.

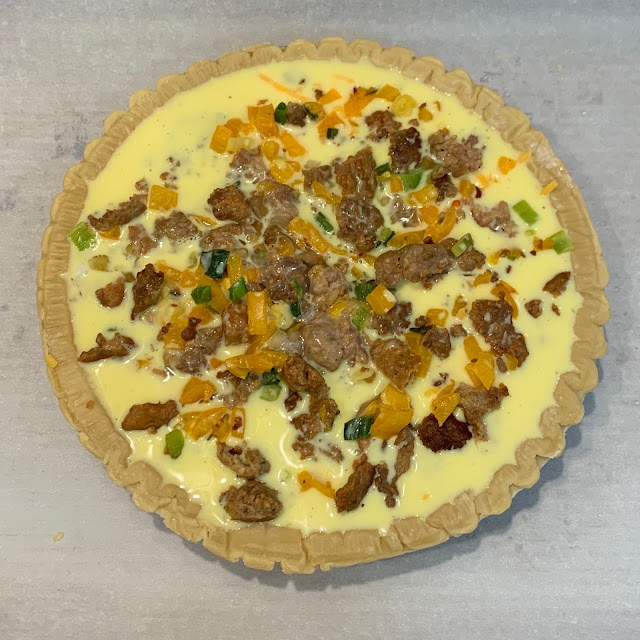
    I love my Italian Sausage, Pepper, Green Onion and Cheddar Quiche recipe for a number of reasons.   You can make the sausage, peppers, and onions ahead of time and assemble the quiche the day you plan to serve it.  Or you can make it during the Super Bowl for dinner the following night... It was that or sleep.  Just saying.

    Some notes before we begin.  I use the whole green onion, but if you prefer a milder taste then use the green parts only.  You can use any type of bell pepper, and while green or red peppers might be more visually appealing, I do not like the taste of either and they don't agree with my tummy.  Hey, it is my recipe and my preferences.  Feel free to substitute half and half or cream for the milk, but I find milk goes better when you have rich fillings, and Italian sausage and cheddar cheese are as rich as you get.   And while you can use any type of a sausage I highly, highly, highly recommend Premio Sweet & Hot Italian Sausage.
    It is the perfectly seasoned and they sell their sausage without the casings.  I substitute Premio Italian sausage in so many recipes that call for ground beef from bolognese, to meatballs, to meatloaf.  I particularly love this Italian sausage mix.  It is the perfect ratio of sweet with a little heat. And if you are thinking that Premio sponsored this post they did not.  No one did.  But Premio, if you want to sponsor any future posts call me!

    Now that I'm thinking about it I realize that most of my favorite dishes are either vegetarian or involve pork of some sort.  I mean sausage, pepperoni, bacon, pork chops, ham...  Can you be a porkatarian?  Click here for my other pork based quiche recipe.

    While this is my recipe and my preferences, feel free to substitute ingredients based on your preferences.  That's the beauty of cooking.  And leave me a comment if you enjoyed this recipe. 

    Italian Sausage, Pepper, Green Onion and Cheddar Quiche

    Ingredients:
    • 2 green onions chopped (about 1/2 cup)
    • 1 cup diced orange bell pepper (about 1/2 of large pepper) 
    • 1 lb Italian sausage (mix of 2 hot links and 4 sweet links)
    • 2 cups shredded cheddar cheese, divided in half
    • 5 large eggs
    • 1 cup whole milk
    • Salt and pepper to taste
    • 1 frozen deep dish pie crust
    Directions:
    1. Preheat the oven to 350 degrees and place pie crust on baking sheet
    2. Remove sausage from casings.  Brown sausage (without oil, butter, or  cooking spray) in a large pan over medium high heat.  While browning sausage break into bite sized pieces
    3. Once browned transfer sausage with a slotted spatula / spoon to paper towel lined bowl.  Make sure to keep the left over grease in the pan for sauteing the veggies
    Yep, Rocky was waiting for a sausage sample.  How could I say no to that face?

    4. In the same pan used to cooked the sausage, saute peppers and onions in sausage grease over medium heat until soft, about 5 minutes
    5. Remove paper towel from bowl with sausage.  Add cooked peppers and onions to bowl with sausage and mix to combine ingredients
    Be careful, your family might try to eat the filling when you're not looking 
    6. Whisk together eggs and milk until incorporated and season with salt and pepper to taste
    7. Fill pie crust with half of the sausage mixture
    8. Top sausage filling with 1 cup cheese
    9. Add remaining sausage mixture over cheese
    10. Pour egg mixture over sausage filling
    11. Top with remaining 1 cup of cheese
    12. Bake quiche at 350 degrees preheated oven for 50-55 minutes until eggs are set (a toothpick inserted should come out clean) and cheese is browned
    13.  Allow quiche to rest for 20-30 minutes before serving
     
    Or if you made the quiche the day before like I did, allow it to come to room temperature.  I know some people like cold quiche, but I'm not some people.  I personally cut a slice and let it warm in a 350 degree oven for 10 minutes, but my husband and son like it room temperature.  What's your quiche temperature preference?  Are you a warm, room temperature, or "some people" cold type?