Sunday, December 22, 2019

DIY Original Artwork Coffee Cups

This is an easy last minute gift idea featuring original art work.  A few weeks  ago I went to a Winterland / Holiday event for children and this was one of the arts and craft projects featured.  It was hands down the most popular craft table.  Kids from ages 1-2 years old and up to grammar school were decorating cups and having a blast.  Clearly the little ones, like my son and younger, needed some adult supervision and some help opening the markers, holding the cups, and reminding them not to draw on the table, floors, each other etc.  I'm not sure if he or I had more fun (I probably did), but this cup is my new, most favorite thing.
I proudly drink out of it all day at work because every time I see it, I smile.  And everyone who sees it thinks it is the most special gift... BECAUSE IT IS!  I have an original piece of art from my 2 year old that can be used daily and washed without fear of ruining his scribble artwork.  This is such a great alternative to picture cups and will also last for years to come.  Plus, it is a fun project to do with your kids and only takes a little more than 24 hours before it is cured and ready for use so it is a great last minute gift idea.  It is also a budget friendly gift.
Acrylic paint markers and cups can be purchased at your local arts and craft store (think Michaels, etc.).  I purchased all my supplies on Amazon.  For an even better deal look for coffee cups at your local dollar store.

For this project you will need acrylic pens, ceramic coffee cups, and rubbing alcohol. And obvi some newspaper to cover your work space. I also recommend priming your markers so they are ready to use before sitting down to color, especially if you have a 2 year old like mine who is all about monkey see, monkey do. Once he saw me priming the markers he stopped wanting to color the cups and wanted to “boop” the table so we had to take a break and return to coloring the cups later.  And yes he still remembered and wanted to make one mark on the cup followed by a boop on the table, over and over...  While I chose coffee cups for this gift you can use any oven safe ceramic medium (plate, bowl, vase etc.). 
DIY Original Artwork Coffee Cups 

  • Acrylic paint pens / markers
  • Rubbing alcohol 
  • Ceramic mugs
  • Newspaper
Directions:
  1. Cover your workspace with newspaper
  2. Wipe cups with rubbing alcohol
  3. Prime markers so they are ready to draw with
  4. Once cups are dry let your child go crazy and color the cups to their liking.  (Why not color a cup with them?!)
  5. Let  cups sit undisturbed for 24 hours
  6. Bake for 40 minutes in a 300 degree oven or follow the directions recommended with the acrylic paint pen manufacture
  7. Let cool completely
Once cool wrap and gift or wash and use your original, one of a kind masterpiece.  

I also had fun making a cup and when my dad saw it he ranted and raved about it (he loves my original art) so I may consider giving him this cup I made.
Leave a comment with your finished project and Happy Holidays! 

Wednesday, October 9, 2019

Pork Chops with Apples and Herb Mustard Gravy


Creative recipe name right?  What I wanted to call this recipe was BIG ASS Pork Chops with apples, but what if kids are reading this?  And by kids I mean Master Chef Junior wannabes.  And side note, if you are reading this, and ARE a Master Chef Junior wannabe or former contestant, I am so flattered!

It's apple picking season here in New Jersey.   I look forward to our yearly excursion to pick apples and then reward ourselves with warm apple cider donuts and apple cider.   After all, you do get a ton of steps walking the orchards looking for the apples that make the cut to bring back home.


If you are wondering what happens to the apples that don't make the cut they get thrown.  Carter clearly has a pitching arm.  And apple picking is even more fun now that I have a toddler who loves all things apple picking too.  


Every day Carter used to ask for a "nana" aka banana, but since apple picking this past weekend he wants an apple in the morning and an apple in the evening.  


Considering we bought a gagillion (I'm making gagillion a thing) apples, I oblige his requests.  Plus a little natural fiber can't hurt...  While I love apples too, especially with yogurt dip or cashew butter, I often need a break from eating them in their raw state.  And apples and pork are a tried and true fantastic pair.


Anyone who knows me knows I love pork and sweet and savory combinations are my jam.  My Pork Chops with Apples and Herb Mustard Gravy is both sweet and savory.  This recipe uses apples and apple cider, not apple cider vinegar.  When I hear "apple cider" I automatically think of vinegar so it's important we clarify that now since the two, while fabulous, are not the same.  However, I love apple cider vinegar, and have made this recipe sans apple cider with ingredients most people keep in their cupboard pantry (us small house folk don't have pantries).  If  you don't have apple cider, an alternate sauce base is 2 ounces apple cider vinegar, 2 ounces chicken stock, and 2 teaspoons honey combined.  Feel free to use smaller pork chops and or boneless, but adjust the cooking time accordingly.  While restaurants may tell you that the chef recommends a medium rare pork, I do not like, nor recommend eating pork raw.  Neither does the USDA who make the following recommendation when cooking pork:
Cook all raw pork steaks, chops, and roasts to a minimum internal temperature of 145 °F as measured with a food thermometer before removing meat from the heat source. For safety and quality, allow meat to rest for at least three minutes before carving or consuming. For reasons of personal preference, consumers may choose to cook meat to higher temperatures.  (Link to full article here)
Now on to the recipe.  If you try it, let me know how you like it and leave me some love in the comments below.

Pork Chops with Apples and Herb Mustard Gravy

Printable Recipe


Ingredients:
  • 2 bone in pork chops, 1.5-2 inches thick (the thicker the better... am I  right?  You know I am)
  • 2 apples, cored and thinly sliced
  • 2 tablespoons butter, divided
  • 8 tablespoons apple cider, divided
  • 1 tablespoon Dijon mustard
  • 1 teaspoon chopped fresh herbs (I like rosemary and thyme)
  • 1/4 teaspoon Wondra flour
  • Salt and pepper to taste
Directions:
  1. Preheat  oven to 400 degrees
  2. Season pork chops on both sides with salt and pepper
  3. Melt 1 tablespoon butter in oven safe pan over medium-high heat.  Cook pork chops for 5 minutes per side or until browned
  4. Once pork chops are browned on both sides add 6 tablespoons of apple cider to pan and immediately place in the oven to finish baking for 10-15 minutes or until pork reaches an internal temperature of 145-160 degrees
  5. While pork is baking, melt remaining 1 tablespoon of butter in a sauté pan over medium high heat.  Add apples and remaining 2 tablespoons of apple cider and cook moving apples  around in pan for 5-10 minutes until apples are browned and beginning to soften.  Once cooked, remove from heat, and season with salt and pepper to taste
  6. Once pork is cooked remove from pan and allow to rest for 3 minutes
  7. While pork rests whisk in mustard and herbs into pork pan drippings until combined.  Whisk in Wondra flour for one minute to thicken sauce
  8. Serve pork chops over sautéed apples.  Top with pan dripping gravy
I recommend serving the pork chops with sheet pan roasted potatoes and asparagus (recipe to follow so stay tuned).  In the meantime check out my other potato and asparagus recipes:

Roasted Asparagus
Crispy Parmesan Roasted Potatoes

For those of you who didn't notice I will now be providing links to printable versions of my recipes.  Ideally I will  update all my recipes with printable links in the future, but cut a girl some slack while I enjoy the end of my maternity leave with Luke.

    Thursday, September 19, 2019

    Strike a Pose

    In the words of Madonna, "strike a pose."  Unless you are a 2 year old who wants to move, move, move and go, go, go.  I had to take an action shot of little man today because I'm loving this affordable outfit.


    Get it Carter!  And get it daddy who dressed him today.  Apparently my husband knows a thing or two about fashion.  

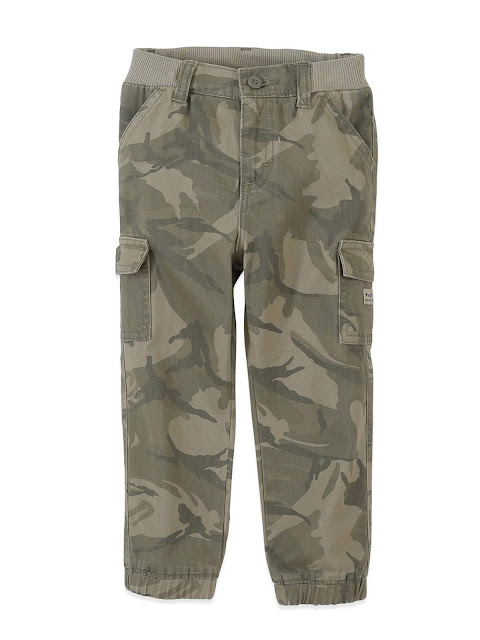
    In the excitement of having a first child we didn't tend to look at price when shopping.  If my husband or I saw something cute, we HAD to have it for Carter.  And now a days boys clothes are adorable so we want everything.  However, with two kids, and all the costs involved (food, daycare, diapers), we now try to be a little bit more cognizant of the cost of our purchases, especially when it comes to clothing.  Now don't get me wrong, we still splurge every now and then.  The boys are 22 months apart and were born around the same season so we have been lucky to be able to recycle tons of Carter's old clothes.  It's been really fun to see Luke wear the clothes Carter once wore.  Yesterday I hung up all of Carter's former 3-6 month clothes and it gave me all the feels.  It was like taking a walk down memory lane.  I know one day Luke won't want hand me downs, but luckily that day is not today and camo is NEVER going out of style (at least not in my world).  Our go to stores for toddler clothes and great deals are Target, Old Navy, Costco, and Walmart.  Yes I said it, Walmart.  Don't believe me?  The pants he's rocking today...
    Walmart.  And those kicks... 

    Walmart!

    Both the Wrangler Camo Pants and Athletic Sneakers were purchased in store at Walmart for a combined total under $15.  They are fashionable and can be worn various ways.  Camo is on trend and the pants seem like they will be great quality.  Plus grey and white sneakers go with everything!  Blue clothes, black clothes?  It don't matter.  It works!  Grey sneakers are the best.  We will see how long the shoes last, but they feel comparable to Champion, which was my go to shoe brand when Payless was still a thing (RIP Payless, RIP!).  Carter is extremely active and growing like a weed so sneakers only last  him a few months.  Every time I blink I feel like his feet have grown again.  He's currently a toddler size 7 and he just turned 2.  I'm  hoping future NBA all star.  With the price of these shoes I don't feel bad tossing them if and when Carter grows out of them or more likely destroys them playing "ball".  They are far cheaper than the majority of the other sneakers he grew out of after a few wears.  And more money in my wallet and not down the drain makes me a happy mama.

    How do you save money on kids clothes?  I would love to hear your secrets in the comments below.

    Friday, July 26, 2019

    Coconut Cashew Protein Balls Recipe

    I love LARABAR Original Fruit & Nut Bars. What's not to love about dates, nuts, and spices?  These bars are rich and decadent with good for you ingredients.  I often reach for a LARABAR when I'm craving something sweet and trying to be good.  Emphasis on trying.  Even though LARABARs are often sold among protein bars I would argue they are not a protein bar considering they average 3-5 grams of protein per bar.  However, what they lack in protein they more than make up for in flavor and texture.  LARABARs are soft and moist and not the protein bar bricks I grew up with that my mom used to share with our family dog during long runs.  Totally not making that up.  My former dog loved peanut butter flavored PowerBars.  She also loved GU gel, which at the time was the only soft protein product around.  Who else remembers the weird goodness that was GU?

    I've been experimenting with recipes in search of making my own protein treat that's not a dry brick.  After a few failures (I gave up on protein cookies) I believe I finally achieved what I set out to do with this recipe.  These protein balls are soft and moist (I have to stop saying "moist") and don't have that artificial protein taste found in so many commercial protein goods.  I would describe them as LARABAR Cashew Cookie meets Trader Joe's Coconut Cashews.  And if you have tried either, they are both equally awesome.

    You can still make these protein balls even if you don't have coconut flavored protein powder lying around.  Vanilla would be a substitute with a similar taste.   I'm sure chocolate would also be good, however, I'm more of a vanilla gal.  Actually I'm more sprinkles, but I've completely lost track of the direction of this post.  Just remember the flavor profile will be different if you use a different protein powder or nut butter flavor.  If you do go rouge, and we all know I'm a fan of going rouge, let me know how your protein balls turned out in the comments below.

    Coconut Cashew Protein Balls 


    Ingredients:
    1/2 cup uncooked oatmeal
    1 scoop coconut flavored whey protein powder, approximately 1/4 cup (I like and use ISOPURE Low Carb Protein Powder in Toasted Coconut)
    3 tablespoons hemp seeds
    1/2 cup unsweetened coconut flakes
    4 tablespoons cashew butter
    1 tablespoon agave nectar*
    2-3 tablespoons water
    Optional: extra coconut flakes to roll balls in

    Directions:
    1.  Put all ingredients except optional coconut flakes into food processor.  Pulse until ingredients are incorporated and dough is soft.  If dough is dry and crumbly add one tablespoon of water at a time until desired consistency is achieved
    2. Roll dough into 1 inch sized balls
    3. Optional: roll formed balls in extra coconut flakes

    Enjoy immediately or bring these protein balls with you for an on the go delicious, protein-packed treat.

    * For a sweeter protein ball use 2 tablespoons agave and 2 tablespoons water in above recipe

    Wednesday, July 24, 2019

    How I Saved Money On My Elvie Breast Pump

    If you have read my blog you know I'm all about getting a deal and saving money.  It's an adrenaline rush for me.  And yes I know I'm a grandma trapped in a MILF body.   We all have our issues now.


    I had seen the Elvie Breast Pump awhile ago when it was only available in the UK.  At the time I was no longer breastfeeding and forgot about it.  I debated over which breast pump to get with this pregnancy.  I ultimately decided on the Spectra S9 since my Spectra S2 is still in great working condition and a hands free breast pump made sense with a toddler.  While I love my S9 for the house, I wanted more in a hands free breast pump.  Like the ability to hold my son while I pump.  And more discretion.  If you have pumped while driving then you know that traditional breast shields are not subtle.

    And before I go on I'm still shocked that people don't know that if you have insurance then you can get a free breast pump every pregnancy.  I have gotten free breast pumps with each pregnancy with both Edgepark Breast Pumps (Spectra S2) and Aeroflow Breastpumps (Spectra S9).  The application is all online.  It's an easy and fast process.

    At some point during my last pregnancy I heard about the Willow.  The Willow is a wireless, thus handsfree, breast pump that sits in your bra and is fairly discreet.  I was so intrigued especially considering you can wear the Willow while working or out at dinner.  Willow's $500 price tag, however, held me back from purchasing it.  Especially since I didn't know if I would be able to breastfeed or how my breastfeeding journey would go.  My plan was to consider purchasing the Willow closer to my return to work if I was still breastfeeding.  And for the record, I'm 5 weeks out and breastfeeding is going awesome!

    A few weeks ago I saw someone selling a brand new Willow for $100 and I impulsively reached out to her to purchase it.  And how could I not?  $100 for a Willow is a steal!  (Did you miss the part where I wrote that the Willow retails for $500 not including the cost of milk storage bags?). Unfortunately I was a few seconds too late and she sold it to the person who reached out immediately before me.  I was bummed, but it got me on a mission to find the Willow on sale or deeply discounted.

    While searching for a new Willow at a discounted price (with no luck by the way) I kept stumbling upon ads for the Elvie and I remembered learning about this breast pump of the future.  I began researching both breast pumps and soon realized that the Elvie was a better fit form me.  The Elvie is the same price as the Willow, but doesn't require the expensive Willow breast milk bags.  Also the Elvie is smaller, lighter, and more quiet than the Willow.  And probably the biggest factor for me is that the suction of the Elvie suction is similar to the Spectra.  Many reviewers reported that the Willow was painful on the lowest setting and caused their nipples to bleed!  I dealt with my fair share of nipple pain with my first so this was the ultimate deal breaker.

    I needed the Elvie.  The only problem, it was sold out in the US and since I needed it (I'm so dramatic) I didn't want to wait any longer on the wait list for the next shipment.  To my surprise I found it for sale online at Buy Buy Baby.   I tried to use one of my beloved 20% off coupon with purchase, but Elvie is not a brand that you can use with these coupons.   However, I received a 15% off coupon for the items I did not get from my baby registry so I did what any logical person would do who loves a deal.  I followed the directions to activate my 15% off coupon, deleted the Elvie from my shopping cart, added it to my baby registry, and then proceeded to purchase the Elvie directly from my baby registry link.  And it worked!


    And while I was so excited to save, I realized that I probably could have used this coupon for for everything, including UPPABaby that was still on my registry, but what can you do?

    Plus I used Ebates (I'm not used to the new name of Rakuten) and saved even more money.  $8.50 to be exact!


    I now have a lifetime earning of over $1000 and am currently waiting for a $64 check just by using Ebates.  I'm not going to explain what Ebates is since I've written about it countless times with the last post linked here.  Otherwise you can search the blog with keyword "Ebates" to read all my posts about this awesome website that gives you cash back for shopping.  Sign up with my referral link here and get $10 after your first purchase online or in store via the app.

    And for the record, the Elvie is amazing and totally worth it.